Social Networks Setup
Social Networks Setup is the most important step in order for WordPress Social Login to work properly. Things may sound complicated at first, but fear not. This guide will walk you through the required steps and explain all the logic behind.
Basically, Social Login allows your website visitors and customers to register on using their existing social account ID, eliminating the need to fill out registration forms and to remember usernames and passwords. Social Login links logins to one or more social networking services to a website, typically using either a plug-in or a widget. By selecting the desired social networking service, the user simply uses his or her login for that services to sign on to the web site.
At a technical level, Social Login uses a number of open protocols to allow secure authorization in a simple and standard method from web, mobile and desktop applications (i.g, OAuth). Nowadays, most social networks implements those protocols to make their users accounts available through an Application Programming Interface (API). Given you have the right user authorizations, your website may access the said APIs to perform a wide range or operations in behalf of the user (i.g., social sharing, user profile, user friends list, user activity stream, status updates and more).
Social Login is the process by which users can sign-in into a website through their social IDs. WordPress Social Login is a plugin that do all the heavy lifting for you and adds Social Login to your website. Social networks are also called “identity providers” or IDP for short.
Choosing social networks
WordPress Social Login provides a myriad of social networks to login with and you can use as many of them as you wish but you certainly don't want to replace the burden of remembering usernames and passwords on your website users with a long list of providers. A returning user may forgot the social network he used to sign-up in the first place. Social Login best practices recommends to only offer a limited number of social networks to sign-in with.
Keep the list of providers relevant to your website audience. Also keep in mind, that given the choice, your website visitors may feel comfortable with some social networks than with others.
Registering social networks
Unlike Social Sharing. Social Login requires a little bit of effort on your part to have it up and running in your website.
Most social networks and identities providers do not simply allow any website or application to connect and communicate with their APIs. As a matter of control and security, Google, Facebook, Twitter, etc., will require you to apply for an application first. Generally speaking, registering a new application is free and only takes a few minutes.
When registering with a provider, there's few common terms used. Application, consumer and client are all synonyms. Application credentials (i.e, ID and Secret or Key and Secret) may differ in format, name and content depending on the social network. Application Secrets are called Secret for a good reason, so keep them secret.
WordPress Social Login has all the basic instructions for registering with the various social networks it supports, but we will explain how to setup and register your application with WordPress.com as an example:
-
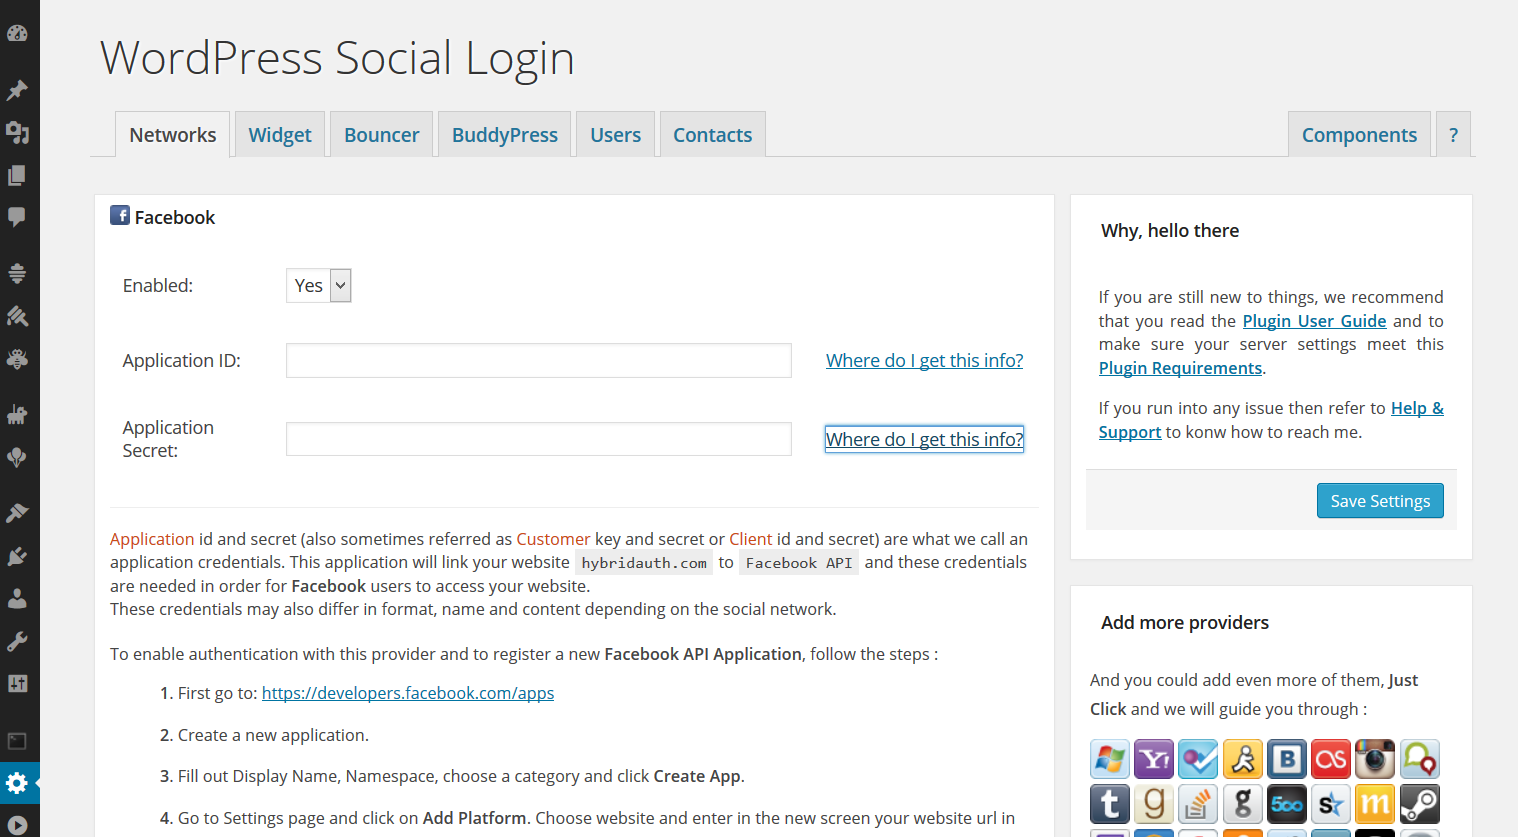
Connect as an administrator to your website, then navigate to WordPress Social Login and select Networks tab. WordPress Social Login can be found under the WordPress Settings menu on the left side bar.
-
By default, WSL will enable Facebook, Google and Twitter for you. To add “WordPress.com”, go to “Add more providers” then click on the () WordPress icon.
-
Set Enabled to YES, to allow your website users to authenticate with their WordPress.com IDs.
-
WSL should automatically display the basic instructions for registering an application. Alternatively, you may click on Where do I get this info?
-
To enable your website to communicate with the WordPress.com API, you need to create an application. Simply follow these steps :
- First go to https://developer.wordpress.com/apps/.
- Log in using your WordPress.com account. If you don't already have an account, go ahead and create a new one.
- Click “Create a New Application”.
- Fill out any required fields such as the application name and description.
-
“WordPress.com” will ask you to provide a “Redirect URL” (other providers may call it “Callback URL“). This Redirect or Callback URL is usually provided by WSL, just copy it form the basic instructions and past it on the required field.
WSL Callback URLs looks like this :
http://mywebsite.com/wp-content/plugins/wordpress-social-login/hybridauth/?hauth.done=WordPress - Type your domain name into “Javascript Origins”.
- Set “Type” to “Web client”.
- Click “Create” to submit the form.
- Once you have registered, you will be redirected to a new page where you can found your application credentials. Simply copy and past those created application credentials into the matching boxes in WSL forms.
Here's also few screen shots to help. But keep in mind that things may change, perspectives can become different, ideas move on. Each social network have hundreds of employees to keep things moving forward. If this guide or any of WSL basic instructions become out dated, then use Common sense and Google. Youtube is also a great resource. And, as always, you can ask the Community for help.
 |
 |
 |